Chimneys and flashings represent the most common source of roof leaks in UK properties, accounting for approximately 60% of water ingress problems My Roof Surveyor UK identifies during surveys. These critical junctions between roof covering and vertical elements are inherently vulnerable to weathering, movement, and deterioration—requiring expert assessment to identify problems before they cause extensive interior damage.
This comprehensive guide explains chimney construction and common problems, flashing types and failure modes, what professional surveyors examine, and appropriate repair approaches that provide long-term weather protection.
Understanding Chimney Stack Construction
UK chimney stacks vary significantly based on property age and original construction quality.
Typical Components:
- Brickwork: Main structural element, traditionally solid brick
- Chimney pots: Terracotta or clay terminals extending above brickwork
- Flaunching: Cement mortar securing pots and weatherproofing stack top
- Pointing: Mortar joints between bricks
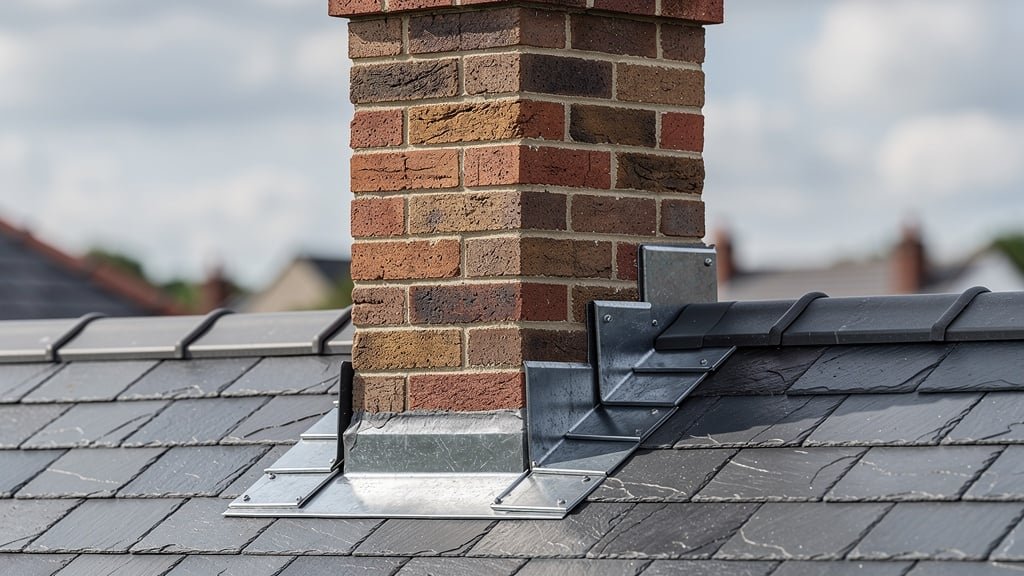
- Flashing: Lead sheets sealing junction between stack and roof
- DPC (Damp Proof Course): Waterproof membrane within stack (modern construction)
Common Chimney Problems
Professional surveys identify recurring chimney defects affecting weather-tightness and structural integrity.
1. Deteriorating Pointing
Mortar between bricks weathers over time, creating vulnerability:
Failure mechanisms:
- Freeze-thaw cycles causing mortar to crack and crumble
- Wind-driven rain penetrating deteriorated joints
- Original lime mortar reaching end of serviceable life (80-120 years)
- Inappropriate cement repointing cracking due to lack of flexibility
Consequences:
- Water penetration into chimney breast causing internal dampness
- Freeze-thaw damage accelerating brickwork deterioration
- Structural instability if pointing failure is extensive
- Staining and efflorescence on interior walls
A Manchester Victorian terrace we surveyed had original lime pointing that had deteriorated. The homeowner had experienced damp patches on bedroom walls near the chimney breast for two years. Investigation revealed water penetrating through failed pointing, saturating chimney brickwork, and tracking down into interior spaces. Repointing cost £1,200; delaying further would have required internal replastering adding £2,000+.
2. Flaunching Cracks and Failures
The cement mortar securing chimney pots is highly vulnerable:
- Thermal movement: Daily temperature cycles cause expansion/contraction
- Cracking: Rigid cement unable to accommodate movement
- Water penetration: Cracks allow rain directly into stack top
- Pot displacement: Deteriorated flaunching can't secure pots properly
- Complete failure: Flaunching breaks away entirely in severe cases
Failed flaunching allows significant water ingress at the most vulnerable point—the stack top where rain impact is greatest and water can enter directly into chimney structure.
3. Damaged or Missing Chimney Pots
- Frost damage causing pots to crack and split
- Storm damage displacing or destroying pots
- Deliberate removal without proper capping
- Missing pots allow rain directly into flues
4. Structural Movement and Leaning
Exposed chimney stacks experience substantial wind forces:
- Foundation settlement: Causing stacks to lean
- Mortar deterioration: Weakening structural integrity
- Storm damage: Extreme weather causing movement
- Danger: Unstable stacks risk collapse onto property or people
Structural chimney problems require immediate professional assessment—unstable stacks are genuinely dangerous and may require emergency stabilization or removal.
Understanding Roof Flashing
Flashing creates weatherproof seals at vulnerable roof junctions.
Flashing Locations:
- Chimney stacks: Where masonry penetrates roof covering
- Wall abutments: Where roof meets walls or dormers
- Valleys: Internal angles between roof slopes
- Roof lights: Around skylight installations
- Soil vents: Where pipes penetrate roof
- Dormer windows: Complex flashings around projections
Flashing Materials:
Lead (Most Common for Quality Work):
- Extremely durable—100+ year lifespan when properly installed
- Flexible enough to accommodate building movement
- Expensive but provides best long-term value
- Traditional material for period properties
Zinc:
- Lighter and cheaper than lead
- 50-70 year lifespan typically
- Less flexible than lead
- Common on budget construction or repairs
Aluminum/Composite:
- Budget option with 30-50 year lifespan
- Less durable in exposed locations
- Often used for temporary or economy repairs
Bitumen/Felt:
- Short-term solution only (10-20 years)
- Appropriate only for temporary repairs or budget flat roofs
- Not suitable for pitched roof flashings
Common Flashing Problems
Professional surveys identify typical flashing failure modes.
1. Lifted or Separated Edges
Wind getting under flashing edges creates progressive failure:
- Strong winds lift flashing edges, breaking mortar seals
- Once lifted, subsequent winds worsen the problem
- Water penetrates beneath lifted flashing during rain
- Lifted sections flap in wind, potentially tearing
A Bristol property experienced intermittent leaks only during storms with specific wind directions. Survey revealed that southwest winds lifted chimney flashing edge just enough to drive rain underneath. Calm weather or different wind directions showed no problems—but the defect allowed significant water ingress during specific storm conditions.
2. Cracked or Split Flashing
Various mechanisms cause flashing material failure:
- Thermal movement: Repeated expansion/contraction eventually causes metal fatigue
- Building settlement: Structural movement stressing flashing
- Poor installation: Inadequate overlap or fixing creating stress points
- Age: Materials reaching end of serviceable life
Even small cracks provide direct water entry paths—flashing must be completely weatherproof or it fails its function.
3. Failed Pointing
Flashing edges are typically embedded in mortar joints or secured with separate pointing:
- Pointing weathers and cracks, allowing water behind flashing
- Harder than repairing flashing itself
- Often missed during DIY repairs
- Must be repointed with appropriate mortar (lime for period properties)
4. Inadequate Overlaps or Coverage
Installation defects create inherent vulnerability:
- Insufficient upstand height (should be minimum 150mm above roof surface)
- Inadequate overlap between flashing sections
- Gaps at corners or junctions
- Flashing not turned properly into brickwork
These installation problems often don't cause immediate leaks but create vulnerability that manifests during severe weather or as materials age.
5. Inappropriate Repairs
DIY or low-quality professional repairs often make problems worse:
- Bitumen or mastic slathered over failed lead flashing
- Temporary repairs left in place for years
- Incompatible materials causing accelerated corrosion
- Repairs that don't address underlying problems
A Leeds property had experienced chimney leaks for a decade. Multiple "repairs" had covered the original lead flashing with layers of mastic, bitumen, and even roof felt. Our survey revealed the original lead had failed—but rather than properly replacing it, successive contractors had simply added more temporary coatings. The accumulated repairs were causing more problems than the original failure. Complete flashing renewal cost £1,800 but finally solved the chronic leaking.
How Professional Surveys Assess Chimneys and Flashing
Comprehensive surveys examine multiple aspects of chimney and flashing condition.
Visual Assessment from Ground Level:
- Binocular inspection of chimney stack general condition
- Visible cracking, leaning, or deterioration
- Flaunching and pot condition from distance
- Obvious flashing problems or damage
Close Inspection (Roof Level or Drone):
- Detailed pointing examination identifying deterioration
- Flashing edge security and condition
- Evidence of water ingress (staining, moss growth near flashings)
- Flashing overlap adequacy and installation quality
- Structural stability indicators (movement cracks, leaning)
Interior Inspection:
- Chimney breast damp staining indicating water penetration
- Ceiling damage near flashings
- Loft inspection around chimney penetration
- Moisture meter readings on chimney brickwork
Appropriate Repair Approaches
Effective chimney and flashing repairs require proper materials and techniques.
Chimney Repointing:
- Remove deteriorated mortar to appropriate depth (15-20mm)
- Use compatible mortar (lime mortar for period properties)
- Proper joint finishing for weather protection
- Cost: £800-£2,500 per stack depending on height and access
Flashing Renewal:
- Complete removal of failed flashing
- New lead flashing properly installed with adequate overlaps
- Properly embedded in masonry or covered with chase wedging
- Sealed with appropriate pointing
- Cost: £600-£1,500 per chimney; £150-£300 per meter for valleys
Flaunching Repair:
- Remove failed flaunching completely
- New sand/cement mix with proper slope for drainage
- Secure chimney pots with adequate coverage
- Cost: £300-£600 per stack
Key Takeaways
- Chimneys and flashings cause approximately 60% of roof leak problems
- Deteriorating pointing allows water penetration causing dampness and structural damage
- Flashing edges must remain sealed—lifted edges allow water ingress
- Lead flashing provides 100+ year lifespan when properly installed
- DIY bitumen repairs over failed flashing don't solve underlying problems
- Small flashing cracks provide direct water entry requiring immediate repair
- Professional surveys identify problems before extensive interior damage occurs
- Prompt repairs cost hundreds; delayed repairs cost thousands
Frequently Asked Questions
Chimneys are inherently vulnerable because they penetrate roof covering, creating complex weatherproofing junctions. They're exposed to maximum weather impact (wind-driven rain, thermal cycling, frost), rely on multiple materials working together (brickwork, mortar, flashing, pointing), and experience differential movement as roof and chimney expand/contract at different rates. Additionally, many UK chimneys are 50-150 years old with materials approaching end of serviceable life. This combination makes chimney/flashing junctions the most common roof leak source.
Properly installed lead flashing lasts 100+ years. Many Victorian properties still have original lead flashings after 120-150 years. However, lifespan depends on installation quality, maintenance, and exposure. Poorly installed lead can fail within decades. Regular repointing of mortar securing flashing edges extends lifespan. Lead's longevity and flexibility make it the premium choice for flashing despite higher initial cost—it typically outlasts the roof covering itself.
Flashing repair requires specialist skills and safe roof access. While confident DIYers might handle minor pointing repairs, proper flashing renewal requires lead working expertise, understanding of weatherproofing principles, and safe working at height. Additionally, inadequate repairs often worsen problems—we regularly survey properties where DIY flashing "repairs" created more leaks than the original failure. For proper, long-lasting repairs, hire specialist roofing contractors with lead working experience and appropriate insurance.
Dampness on chimney breasts indicates water penetration through: deteriorated pointing allowing rain into brickwork, failed flashing letting water behind chimney/roof junction, flaunching cracks allowing rain into stack top, or missing/damaged chimney pots. Professional survey identifies specific failure mechanism. Don't ignore chimney dampness—it progressively worsens, causes internal decoration damage, promotes mold growth, and can lead to structural timber rot if water tracks into roof timbers. Early intervention when problems are minor saves thousands versus delayed repairs after extensive damage.
Typical costs: chimney repointing £800-£2,500 per stack, lead flashing renewal £600-£1,500 per chimney, flaunching repair £300-£600, valley flashing £150-£300 per linear meter. Costs vary by access difficulty, stack height, material quality, and regional pricing. While these seem expensive, they're minimal compared to internal damage costs (£3,000-£10,000+) from delayed repairs. Professional assessment identifies specific problems requiring attention, preventing unnecessary work while addressing genuine issues before they escalate.
Expert Chimney and Flashing Assessment
My Roof Surveyor UK provides comprehensive chimney and flashing assessment as part of roof surveys, identifying deterioration, installation defects, and weather-tightness problems before they cause extensive interior damage. Our surveys recommend appropriate repair approaches with realistic cost estimates, helping you prioritize work and avoid expensive emergency repairs.
Whether you're experiencing dampness near chimneys, conducting pre-purchase surveys, or maintaining property proactively, our detailed assessments deliver the information needed for informed repair decisions.